Greetings everyone, last is back! So, on the 28th of September I played the RomHack CTF with my fellow mates from JBZ and we arrived third, thanks to a flag submitted at the last second (a typical CTF tactic to make the other teams relax and then pwn them at the very last moment ;). The prize for our awkward outstanding performance was a set of coupons for HTB’s pro labs, either Rasta Labs or Offshore. I chose to go with Offshore, as I had read online reviews saying it is more realistic and less CTF-like than Rastamouse’s one. This post is going to cover what I learned in the process from a “tactical” perspective, I won’t write any spoilers about the lab itself because that would be unfair to others who are still going through it (and against HTB’s rules, I think).
Table of contents
Here’s a overview of what I’m going to cover in this post:
- Introduction and lab description
- Choosing and setting up a C2 Framework
- Covenant usage
- Pivoting and SSH tunneling
- Chaining it all together
- Conclusions
Introduction and lab description
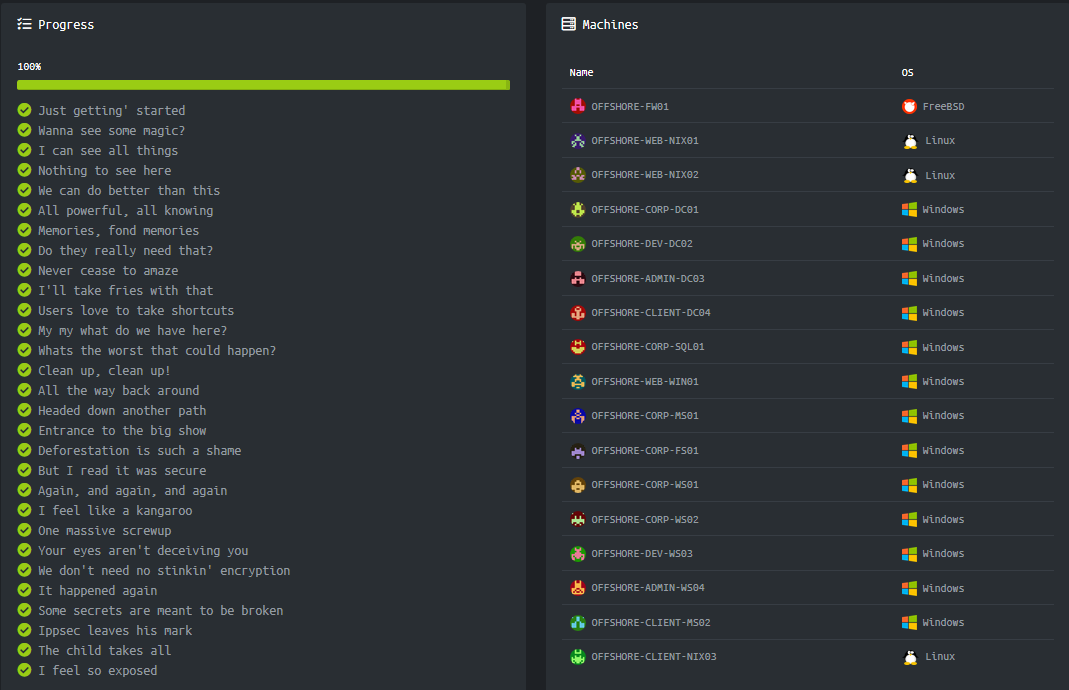
The lab is made of 17 machines, 16 of which in scope (technically the firewall is not in scope, but they say noone is going to keep you from trying to pwn it so, ¯\_(ツ)_/¯). While Windows is the preferential host (as you can see from the screenshot right below this paragraph) you will also find a few Linux machines. There are 29 flags in total (yes, 29, which is not a round number. Yes, I contacted them to make sure there wasn’t a extra hidden flag). Here’s a list taken from HTB’s website containing all of the flags’ tasks and machine names:
I’m not going to disclose a lot of information about the topology of the internal network, but I can say that there is more than one subnet and that firewalls between subnets limit a lot your freedom of movement, even with reverse shells. Suffice it to say that at some point I was daisy chaining 4 remote desktop instances. Facing the “frontline” is a DMZ from which you can access a webserver located at an IP address in the 10.10.110.0/24 subnet. By compromising it you can then pivot behind the firewall and inside the network. From there it only gets tougher.
One of the things I found really valuable about this lab is that, contrary to the OSCP’s one for example, it’s basically all about Windows Server 2016 and Windows 10, with some Windows 7 machines here and there. This kind of lab forces you to use misconfigurations and develop a methodical approach to exploitation and privilege escalation as there is almost no room for kernel exploits, except from only one or two machines in the entire lab. This means that basically all you have to do to complete the lab is technical skills in Active Directory attacks. Keep in mind there is more than one forest. And in a forest there may be more than one domain.
There are also a few sidequests here and there, mainly about reverse engineering, web exploitation and cryptography. Having played in CTFs before helped a lot as these challenges were very CTF-like. The crypto one kept me busy for three days as I usually don’t even look at crypto challenges in CTFs (contrary to my fine mate TheZer0 who should definitely update his bio), but in the end I learned a ton about ECDSA and the ElGamal encryption algorithm.
Choosing and setting up a C2 Framework
Now that I’ve laid down the environment I want to tell you what was the process I went through to decide if and which Command and Control (C2) Framework to use for the operation and why I chose Covenant in the end. I want to stress out it was the first time using a C2 Framework for me as I’ve always done those kind of activities relying on “manual” tools like netcat and nmap, documenting and categorizing data with impractical text files. While this simple toolbox has given me a very methodical approach to operations and has forced me to adapt and not rely on stuff like metasploit (which makes you very lazy), it isn’t professional. Furthermore, when the amount of data started to grow (and it usually happened pretty fast) I regularly struggled to find old pieces of information scattered through the different .txt files. This, coupled with my need to not have my command and control tied to a single laptop, pushed me to evaluate what the infosec community had to offer when it comes to free and open source C2 Frameworks.
But first, the hell’s a C2 framework? At its core it’s a combination of server and client software designed to help with post exploitation tasks, data organization and team cooperation. C2 frameworks usually pack all the necessary components to setup a basic red team infrastructure like a C2 server (which is the keystone of the infrastructure) and a implant, which is the client software that’s going to connect back to the C2 server and execute commands sent by the operator through the C2 server itself.
There is a multitude of C2 frameworks around, but before choosing one I jotted down a list of requirements that the ideal framework for this operation should have had:
- Web UI: the server must be accessible and manageable through a web browser;
- Windows implants: given the prevalence of Windows machines in the lab the implant must be Windows compatible;
- Powershell integration: I did not want to fight with uploading PS script to target machines so the implants must be executable directly with a PS one-liner;
- Built-in red teaming toolkit: for the same reason of the powershell integration requirement, I wanted the implants to already have support for the important tools of trade, like Mimikatz, Rubeus etc.;
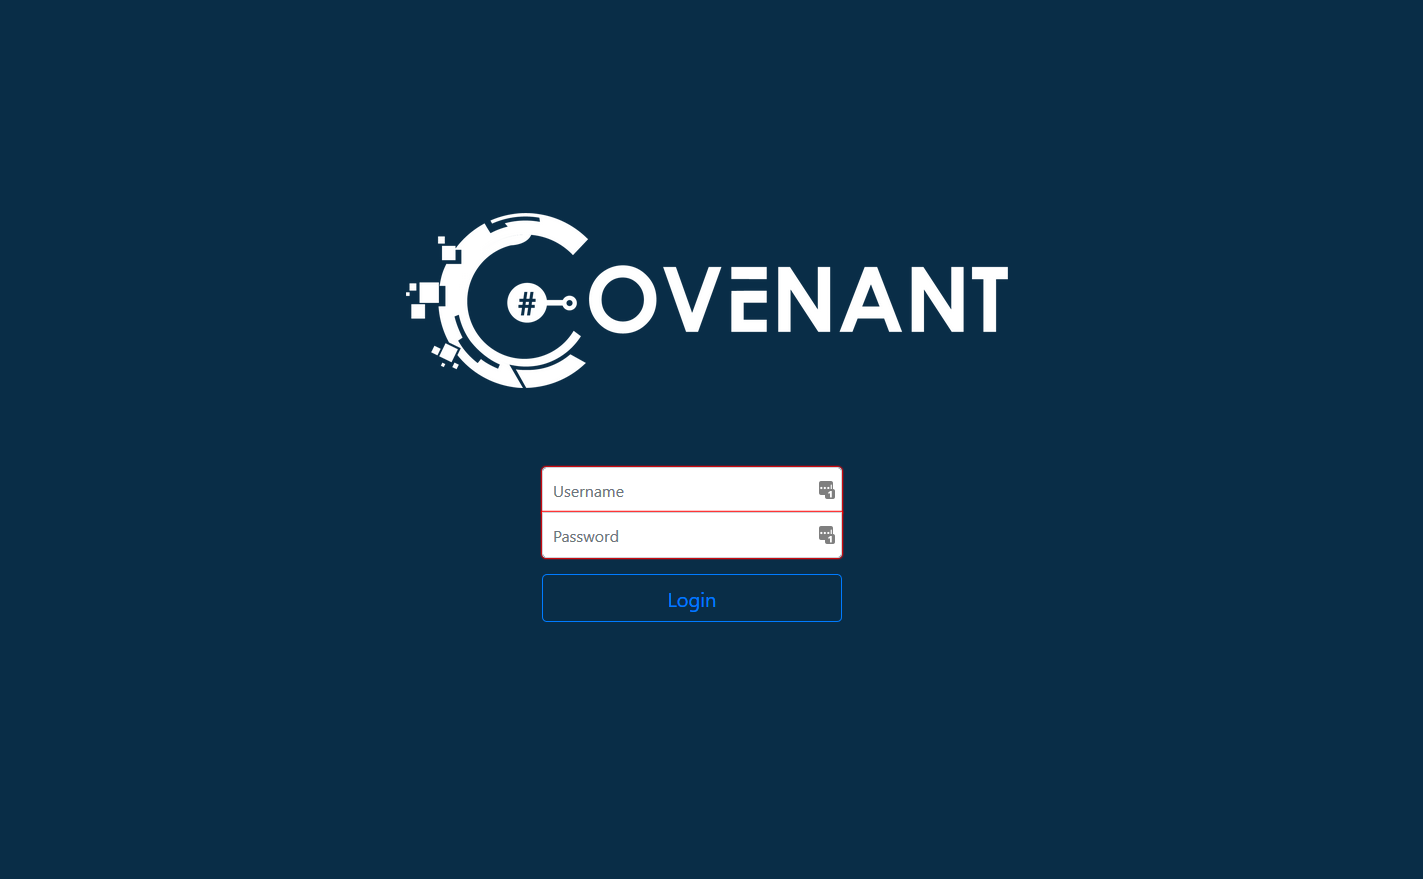
Having also implant pivoting and automatic intelligence data management would have been a plus, so with these requirements at hand I started looking around and testing various C2 frameworks. After a few days tinkering and trying out different platforms I decided to opt for Covenant. What pushed me towards Covenant is that it ticked all my requirements. It’s got a slick Web UI which is really well designed, with only a few bugs (which cobbr and the other devs usually fix promptly once a issue has been opened on Github). The server runs on .Net and is cross platform, mine runs on Ubuntu for example. Installing and running it is as simple as dotnet build && dotnet run but there’s also a docker container if you don’t want to get your hands dirty.
Covenant usage
After setting up Covenant it was time to get used to it. The first thing you see when you log into the server is the dashboard. It’s nothing more than a quick overview of the three major components of the operation: grunts, listeners and taskings. A grunt is how Covenant calls a implant. Listeners are what they sound like: the daemons through which Covenant listens for incoming connection from grunts. You can see in the screenshot below I have two active listeners. Taskings instead are the command the C2 ordered the implants to execute.

On the left panel of the web UI you can choose on which tab to focus: if you switch to listeners for example you can spawn another listener, while the “launchers” tab provides you with a series of options for spawning grunts, ranging from powershell one-liners to compiled .Net binaries and a bunch of other techniques. This provides you with a lot of freedom of movement. My preferred way of spawning a grunt for example was to get powershell code execution and send a one-liner, but there were times in the lab where I could not use powershell. On a machine for example I had write permissions on the file system and I could overwrite a service binary. Knowing that I dropped a compiled grunt binary in place of the service binary.

Moving on, two other important panels are the “Grunts” and “Data” ones. The first is a list of all the grunts you have spawned during the operation, both the active and the lost ones. By selecting a grunt you can view its details and edit its properties. You can also interact with it, send commands, download and upload files etc. On a side note, after two weeks of daily lab resetting my “Grunts” panel was a sad graveyard of inactive grunts, so sad.
However, what really sets Covenant apart from the rest of the C2 frameworks, to me, is the “Data” section. It collects and categorizes all the loot you find on machines, be it NTLM hashes, cleartext passwords and kerberos tickets. And it does that automagically: if you run Mimikatz through a grunt’s command line, Covenant automatically parses the output and adds the relevant information to the database. You know, maybe it’s me, but I find it so cool and valuable! In the same section you will also find the files you download from compromised machines and the screenshots.
Covenant’s features don’t end here as I have not mentioned all the commands its grunts provide. I suggest you check it out by trying it during your next operation, it won’t disappoint you, trust me. There are only two downsides to it I came across during the lab: it has no support for implant pivoting and implants don’t work on Linux. Truth be told, these two pitfalls made me think twice about using Covenant for the Offshore lab as I knew I would have had to pivot through a number of networks and I also knew that I would have had to work on Linux machines. Luckily pivoting has not been much of a problem until the very last phases of the operation and the Linux machines were just a few, so I could handle them manually. I specifically asked the developers of Covenant about pivoting and Linux support and they said it’s planned for the next releases so I guess we’ll just have to wait.
Pivoting and SSH tunneling
Ok I have to say I thought I knew a lot about SSH tunneling and how to use it to pivot to other networks, before starting this lab. First and foremost, what is SSH tunneling and how does it work? SSH tunneling is a technique which allows traffic to be routed through a endpoint which the operator can access through SSH. SSH allows many forms of tunneling, from simple port forwarding to creating tap interfaces and basically establish a VPN connection. I’ll lay down here the various forms of SSH port forwarding and then I’ll explain a tool I learned while going through Offshore.
There are two main forms of SSH port forwarding:
- Local port forwarding
- Remote port forwarding
Local port forwarding
When the operator employes local port forwarding, he creates a proxy on his device, listening on a certain port, which will route traffic hrough an SSH tunnel to a remote host he has SSH access to. From there the host will send traffic to the remote host the operator specified while setting up the tunnel. It’s called “local” because it creates a local proxy (hosted on the operator’s machine) to forward traffic to a remote resource. Ok, theory is all well and good, but how do you actually use local port forwarding? The command syntax is:
ssh -L localPort:targetIp:targetPort user@sshGateway
With:
-Lbeing the option to instruct SSH to instantiate a local port forwarding tunnellocalPortbeing the port on the operator’s device on which the proxy will be createdtargetIpbeing the remote host the operator wants to reach through the tunneltargetPortbeing the port on the remote host the operator wants to reach through the tunneluserbeing the user he has the credential ofsshGatewaybeing the device the operator has SSH access to
Let’s have a look at a typical scenario. In the following image our operator is denied access to a webserver located at the IP address 10.0.0.2 on port 80. The firewall however allows SSH connections and the operator manages to connect to a server located at 10.0.0.1 as root. From there he sees the server he has logged on can “see” the webserver.

As written in the image, the command to spawn a SSH tunnel for local port forwarding is:
ssh -L 1337:10.0.0.2:80 [email protected]
Let’s say now I have to access a resource that’s listening locally on the SSH gateway. It happened on a couple of occasions that a machine I compromised had a webserver listening locally. That meant I couldn’t access it through the browser by trying to contact the machine IP directly. I had SSH access but no means of accessing the webserver remotely. Through local port forwarding I was able to reach the local webserver by putting the IP address of the SSH server as the target:
ssh -L 1337:127.0.0.1:80 [email protected]
This basically means “Mr 10.0.0.1, please forward all the traffic I’m sending from my 1337 to yourself on port 80”.
This kind of forwarding is also very useful in those situation where you manage to compromise a machine which has access to a subnet where there are Windows hosts that can be accessed through Remote Desktop. Instead of forwarding port 1337 to port 80 on the target server you could forward local port 3389 to port 3389 on the target server. By doing that you can then try to Remote Desktop to yourself and the SSH tunnel would route that to the remote Windows host. Alright, enough with this silly trickery, now let’s move on to remote port forwarding.
Remote port forwarding
Remote port forwarding is kind of the opposite of local port forwarding. While local port forwarding saw the operator initiate a connection through the tunnel, remote port forwarding is more similar to the NAT port forwarding you configure on your home router. Employing remote port forwarding the operator can instruct an SSH server to route traffic it receives on a certain port through the SSH tunnel, to another host on the network of the operator machine. It’s most common use, when it comes to offensive security, is routing reverse shell traffic to and from a listener. Let’s see an example:
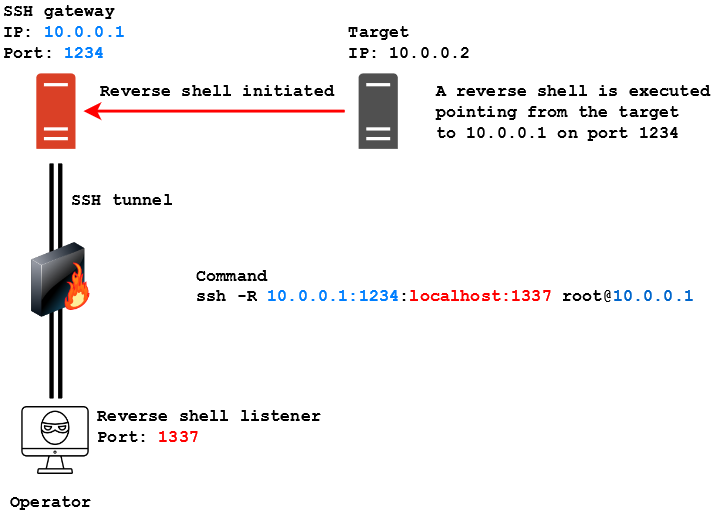
Here our operator managed to get SSH access to the same host we saw in the previous example, but this time he needs the server to route a reverse shell he executed on the target back to himself. The syntax to make this happen is the following:
ssh -R sshGatewayIp:sshGatewayPort:localIp:localPort user@sshGateway
With:
-Rbeing the option to instruct SSH to instantiate a remote port forwarding tunnelsshGatewayIpbeing the IP address of the SSH server that will route the trafficsshGatewayPortbeing the port of the SSH server that will receive the traffic that needs to be routedlocalIpbeing IP address to which the traffic will be routed. Most of the times it’s going to be the operator’s onelocalPortbeing the port to which the traffic will be routed. Most of the times it’s going to be the operator’s listener’s portuserbeing the user he has the credential ofsshGatewaybeing the device the operator has SSH access to
To be more specific, in this scenario a reverse shell connection is initiated by the target machine, pointing to the SSH gateway on port 1234. The SSH gateway has no listener active to deal with the reverse shell, but through remote port forwarding has been instructed to route traffic entering port 1234 to the operator’s machine, which has a listener on port 1337. In this way the SSH gateway routes traffic to the operator and a successful connection is established between the target and the operator’s device, using the SSH gateway as pivot. The command to instruct the SSH server to do this is the following:
ssh -R 10.0.0.1:1234:localhost:1337 [email protected]
Take notice that, unlike local port forwarding, here the IP on which the server listens must be specified. That’s because otherwise the server will automatically start to listen on IP 127.0.0.1, hence remote connections from the target pointing to its IP address will fail has no daemon is listening on its real IP.
NOTE: I learned the hard way (== swearing like hell because connections didn't work) that the directive "GatewayPorts clientspecified" MUST be present inside the server's /etc/ssh/sshd_config otherwise the SSH server is going to listen for connection on 127.0.0.1, thus making the tunnel useless. Make sure this directive is present inside the config, otherwise add it (needs root privileges) and make sure to restart the SSH server!
Dynamic port forwarding and SSHuttle
The last kind of port forwarding SSH provides is called dynamic port forwarding. This technique is kinda similar to local port forwarding, but instead of specifying a single host/port pair to which traffic will be routed, it’s the SSH gateway which gets to decide where to route the traffic. That means if you send a packet to a host in the same subnet of the SSH server, this one is going to automatically route it to the destination you specified, provided you have instructed your OS to proxy traffic through the SSH gateway. Its syntax is like this:
ssh -D localPort user@sshGateway
With:
-Dbeing the option to instruct SSH to instantiate a dynamic port forwarding tunnellocalPortbeing the port on the operator’s machine on which the proxy will be createduserbeing the user he has the credential ofsshGatewaybeing the device the operator has SSH access to
Let’s have a look at the following scenario:
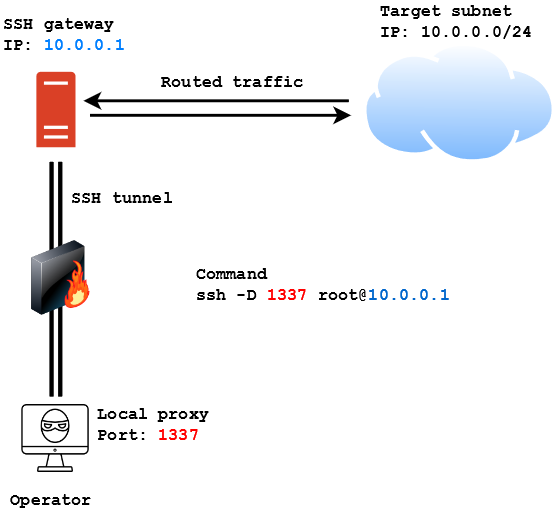
In this case the operator wants to access the 10.0.0.0/24 subnet from outside the network. If he manages to get SSH access to the SSH gateway he can use the following command to instantiate a proxy on his machine on port 1337 and then use proxychains to proxy traffic through that port to reach the machines in the subnet:
ssh -D 1337 [email protected]
This technique is really useful but it has a huge downside: it often messes up the traffic and interferes with tools like nmap. Scanning networks through a SSH gateway using dynamic port forwarding is a huge PITA most of the times. While searching for a solution to this during my time in the lab I came across SSHuttle. This tool creates a tun interface on the operator’s machine (much like a VPN) and then sets rules to forward traffic for the specified subnet through the tun interface. The cool thing about it is that it does not need root access to the SSH gateway (only on the operator machine). Its syntax is the following:
sshuttle -r user@sshGateway network/netmask
In the previous scenario the command to spawn a tun interface with SSHuttle and route traffic to the subnet would have been:
sshuttle -r [email protected] 10.0.0.0/24
A thing which I couldn’t find in the documentation but that I really needed in the lab was the ability to use public key authentication with SSHuttle. The correct way to do it is by employing the following syntax:
sshuttle -r user@sshGateway network/netmask -e 'ssh -i /path/to/private_key'
The -e option is used to specify ssh commands to execute with SSHuttle. In this case the operator can specify the -i SSH flag with the path to the private key in order to access the SSH gateway without prividing a password.
Chaining it all together
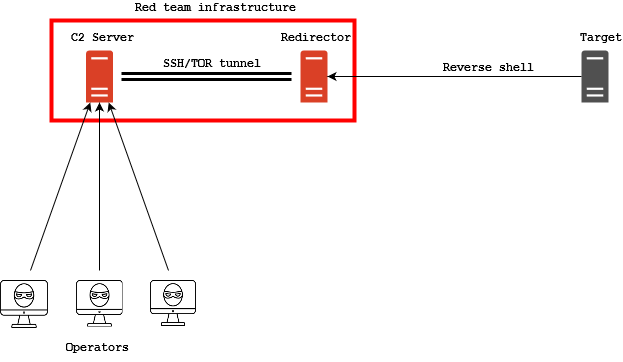
Ok, we have seen all these cool techniques and tools (that everyone knew and I did not…) and now it’s the time to see how I chained them together. First thing, the C2 server. I created an instance of Covenant on my server at c2.notso.pro and I setup OpenVPN to connect to the lab. After fully compromising the first machine in the DMZ I decided to use it as pivot inside the network, so I setup SSHuttle to access the internal network and remote port forwarding to route grunt traffic from the internal network through the pivot and to my C2 server. This is the diagram of the infrastructure:
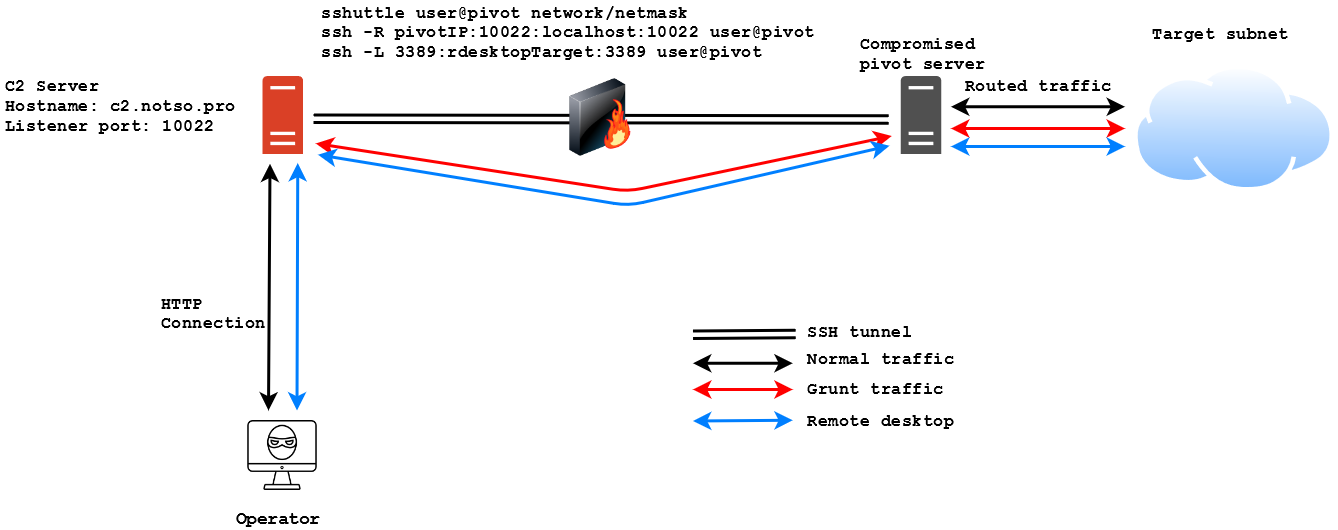
I know it’s pretty basic, I know everyone can do that and I know it’s nothing exceptional, but I like it and I find it really cool!
Conclusions
Finally, the conclusions. I have to say I loved this lab and how it pushed me to learn a ton of stuff. Aside from one or two challenges I think it was pretty realistic. I did not talk about the Active Directory part of the lab as it would have been too much of a spoiler. I plan on doing a post series on Active Directory attacks (explaining in details what I learned from this lab and the various courses I went through). Now the great question, do I recommend this lab? The answer is: absolutely! I mean, this kind of labs forces you to use TTPs you don’t always have the time to practice and that you risk losing if too much time passes. With that being said now it’s time to focus back on the Advanced Web Attacks and Exploitation course by Offensive Security (which I paused for too long I think). I’m planning on doing Rasta Labs as soon as I have time to. See you at the next tactical debriefing, last out.